In this article we’ll talk about why we swaddle babies, the different types of swaddle styles, when you need to stop swaddling and most importantly safe swaddling for hips.

Why swaddle your baby?
Swaddling is one of my number tips for sleep and settling!
Swaddling your baby gives them a sense of security, one school of thought that I’m very much aligned with is it recreates the restricted space they had in the womb.
Swaddling can also keep your baby calm by limiting their startle reflex.
Studies have shown that swaddled babies wake less frequently and sleep longer than non-swaddled babies.
Swaddling can also help reduce the risk of sudden infant death by keeping babies on their back when sleeping.
At what age do I swaddle my baby?
You can start swaddling your newborn baby straight away and while it’s an incredible tool for sleep and settling it is only for babies from birth until they show signs of rolling – this developmental milestone will probably happen around 4 to 6 months old but sometimes younger.
I recommend babies are swaddled for all their nighttime and daytime sleep.
when to stop swaddling baby
When do I need to stop swaddling?
Stop swaddling once your baby starts to roll. As this starts you can transition them into a sleeping bag.
Do not swaddle your baby if they share a sleep surface with another person.
What types of swaddles are best?
Use a lightweight cotton or muslin wrap to swaddle baby – my absolute favorites are the ones with a slight bit of spandex stretch.
Don’t use rugs or a swaddle blanket they are not safe for swaddling as they may cause overheating.
What fabrics organic cotton vs. polyester
I always recommend natural fibres as much as possible for babies – synthetic/polyester fibers don’t breathe as well and may cause overheating.
If your baby is prone to eczema you know it’s number one enemy is heat, so the more breathable/ natural fibers are best to keep your baby cool.
Safe swaddling tips
TIP 1: Prevent overheating by ensuring your is sleeping in the appropriate TOG to temperature – there are guides for this in my sleep programs.
TIP 2: Ensure that your baby is on their back with their feet at the bottom of the cot. Do not cover your baby’s head and face. This is to prevent your baby from overheating and from the wrap blocking their breathing.
TIP 3: For effective swaddling, the wrap must be firm but not too tight. It should allow your baby’s chest to rise normally during breathing. Be wary of wraps and swaddles that don’t allow for full and uninhibited chest expansion. A swaddle shouldn’t be so tight that it pins your baby’s arms in one place you don’t want a lot but be sure to allow some natural arm movement.
What are the most common swaddling techniques?
Technique 1: Traditional wrap
- This type of wrapping is designed to swaddle your baby like a burrito;
- Newborn babies are wrapped with their arms over their chests;
- Generally, this style will be shown in hospital after you have given birth as it will be the one that will suit the majority of babies;
Technique 2: Angel wrap
- This next passage is anecdotal – but I want some to explore it in a PhD study! In my experience when you look at a sonographer image of your baby in utero if they always had their hands about their heads they will usually prefer a ‘hands up’ angel wrap.
- Rather than wrapping the baby with their hands across their body you wrap them under the fold of the swaddles so they sit above their shoulders.
- The Angel Wrap is a great swaddling technique to achieve a hands-up position, or for babies who like to suck on their hands or their swaddle to self-soothe, while still protecting them from the Moro reflex and preventing face scratching. It is a modified traditional wrap with one crucial, initial step – creating a collar.
- Some babies love this position, others will not find it secure enough and it will allow for too much distracting arm movement.
You’ll learn quickly what your baby best prefers.
Step by step technique – TRADITIONAL
To achieve a perfect traditional wrap:
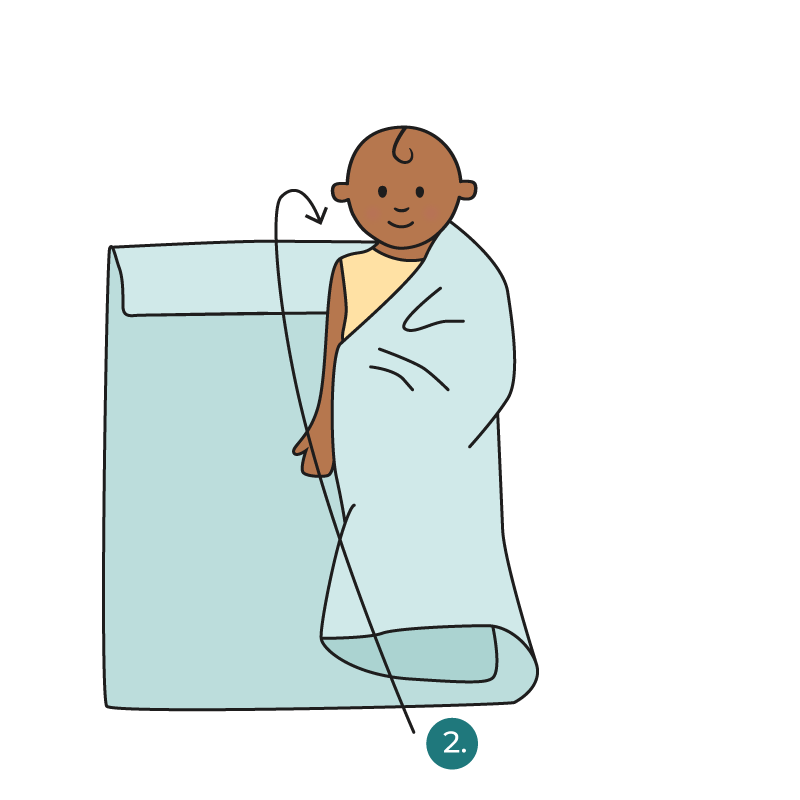
- Step 1: Use a large muslin wrap or stretch jersey material. The bigger the better. Lay it flat in a square shape.
- Step 2: Take your baby and lie them in the middle of the wrap with their head above the top edge of the material.
- Step 3: Bring one of their arms across their body so it sits above their belly button.
- Step 4: Wrap that side of the material across their folded arm and tuck it firmly underneath the other side of their body.
- Step 5: Bring their other arm across their body so both arms are folded above their belly button.
- Step 6: Wrap the other side of the material over them and tuck in firmly underneath their body. Again, don’t be afraid to be quite firm here.
- Step 7: Open the bottom part of the wrap so it makes a triangle shape.
- Step 8: Bring it up over your baby and tuck it loosely around their body, ensuring the material doesn’t come above their chest.
Step by step technique – ANGEL
- Step 1: Use a large muslin wrap or stretch jersey material. The bigger the better, and the stretch material can help make the wrap firmer. Lay it flat in a square shape.
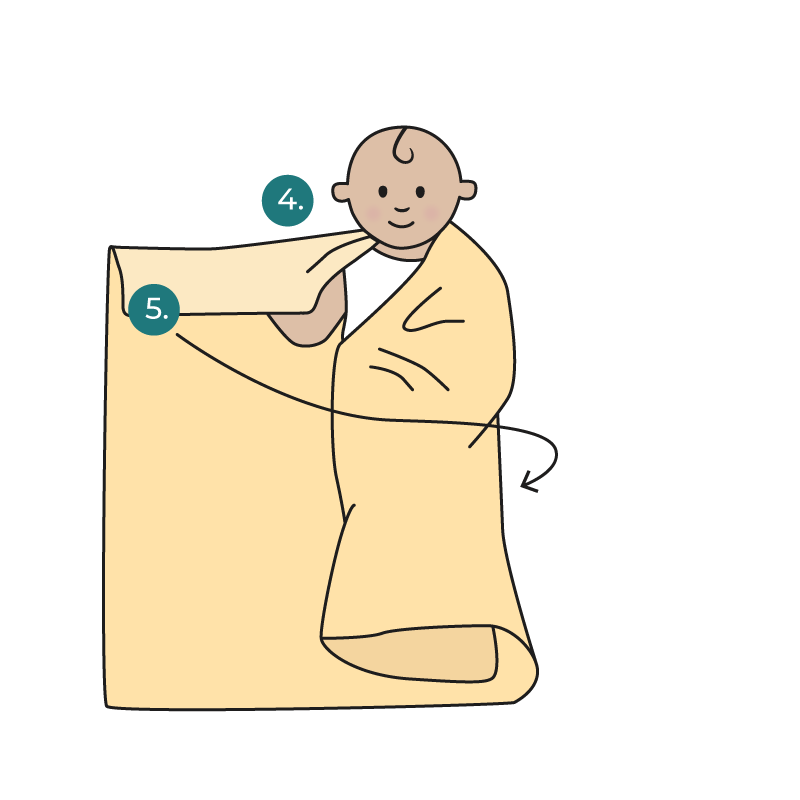
- Step 2: This part is the crucial bit: fold about 10 centimeters of material over at the top of the wrap.
- Step 3: Take your baby and lie them in the middle of the wrap with their head above the top edge of the material, like the collar of a shirt.
- Step 4: Take one of your baby’s arms and bring it up next to their shoulder, tucking their hand up under the folded part of the material.
- Step 5: Bring that side of the material across their body and tuck it underneath the other side of them. Don’t be afraid to be firm here.
- Step 6: Repeat on the other side with the other arm.
- Step 7: Wrap the other side of the material over them and tuck it in firmly underneath, using their body weight to keep it in place.
- Step 8: Open the bottom part of the wrap so it makes a triangle shape.
- Step 9: Bring it up over your baby and wrap baby by tucking it loosely around their body, ensuring the material doesn’t come above their chest.
Remember: firm over the shoulders, loose over the hips.
The Dr Golly Sleep Program has step by step video guides which may be easier than these written steps!
Traditional Swaddles vs Pouch Swaddles
The alternative to a big square piece of cloth is a pouch swaddle.
I love pouch swaddles when they are the perfect fit – they are great for quick middle of the night feeds/changes where you can just zip up and down.
In my experience if these are not the right fit babies will be able to sneak their hands up through the top and touch their chin. Or if they are the ones that allow for the hands above the head for some babies this can be too much movement/too distracting.
My recommendation is if you’re using pouches still have some square traditional swaddles ready to go for those times when they’re not fitting perfectly.
Safe Swaddling for HIPS
The wrap should not be too tight around your baby’s hips and legs. Studies have shown that tight wrapping with the legs held straight can lead to hip problems such as developmental dysplasia of the hip (DDH)
If swaddled correctly, your baby’s legs should be able to bend at the hips with the knees apart.
Transitioning to arms out
Once your baby starts rolling, that’s your sign to start to transition them to arms out.
Many parents are apprehensive about unswaddling their baby for fear of what it will do for settling and sleep, and this is valid – but safety is the number one priority and you’ll be amazed at how quickly they adjust to arms out sleeping.
In my baby sleep program I recommend a transition period where you sleep for a while with one arm out and eventually move to 2.
FAQ
Once my baby has their arms out do I need to keep rolling them onto their back when sleeping?
Once your baby is sleeping with their arms out whether you roll them back onto their back depends if the can roll front to back:
a) Once your baby can roll confidently from front to back, continue to settle them on their back, but allow them to find their own natural sleeping position. If they are able to roll in both directions it is not necessary to wake during the night to turn them over to the back position.
b) If they can’t roll from front to back it’s advisable to turn them over.
Just be mindful that rolling onto their stomach can often be a sign they are cold so to double check the temperature of the room and the TOG of their outfit.
Red Nose steps to follow when baby starts to roll on to their tummy or side
- If you are using a bassinet, it is time to transfer baby into a cot as soon as they first show signs of being able to roll.
- Give baby extra tummy time to play, this helps baby to develop stronger neck and upper body muscles which enables them to roll back over. It’s best to start giving baby supervised tummy time from birth.
- Consider using a safe baby sleeping bag as these may delay rolling.
- Firmly tucked blankets can also help – make sure you follow safe sleep guidelines and have your baby’s feet at the end of the bed.
For more information see the rednose.org.au guidelines.